HOW TO
Hinzufügen von Punkt-Features zum Schwerpunkt und zu der minimalen und maximalen Ausdehnung eines Polygon-Features in ArcGIS Pro
Zusammenfassung
Point features represent specific coordinates when added to a polygon feature. The coordinates point to the location of the polygon and its proximity to the surrounding area on the map. For example, a polygon feature represents a building in an area on the map. Its centroid point feature can be used to represent the exact location of the building, and the minimum and maximum extent of the polygon can represent the closest approximation to the site of the building.
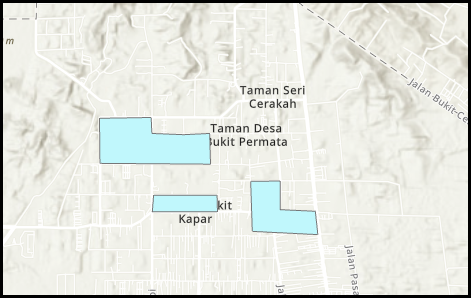
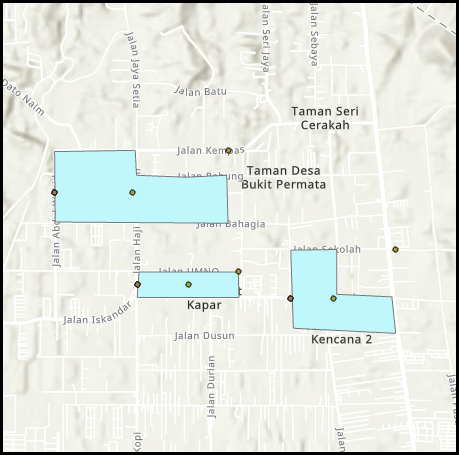
This article describes the workflow to add point features to the centroid and the minimum and maximum extent of a polygon feature in ArcGIS Pro. The following image shows the polygons representing three blocks of building. The maximum extent, minimum extent, and inside centroid of each polygon must be determined.
Vorgehensweise
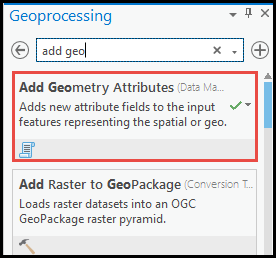
- Generate the central point and extent coordinates values on the desired polygon feature using the Add Geometry Attributes tool.
Note:
The options to create point features include Centroid Coordinates, Central point coordinates, and Extent coordinates (to create both minimum and maximum extents). More than one selection can be made. For alternative methods to determine the centroid location, refer to How To: Calculate feature centroids or How To: Find the centroid of polygons using Calculate Geometry.
- In ArcGIS Pro, navigate to View > Geoprocessing.

- In the Geoprocessing pane, search for the Add Geometry Attributes tool in the search box.
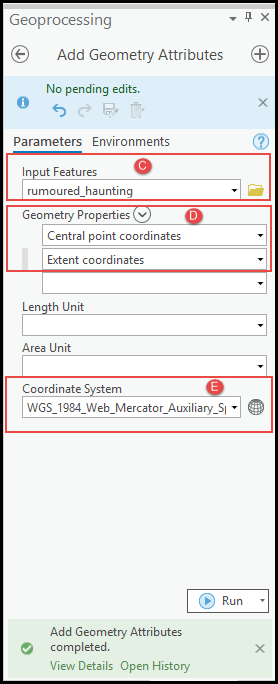
- Under Parameters, select the polygon layer for Input Features from the drop-down menu.
- Select the desired properties from the provided selection for Geometry Properties. In this example, Central point coordinates and Extent coordinates are selected.
- Specify the Coordinate System. Ensure the default coordinate system matches the coordinate system of the input feature.
- Click Run.
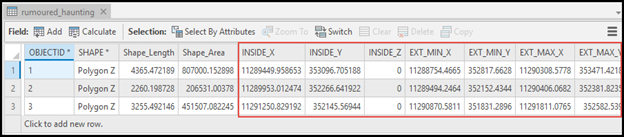
Information on the output point features based on the selected geometry properties is added to the attribute table. In the sample image below, the geometric properties created are INSIDE_X, INSIDE_Y, INSIDE_Z, EXT_MIN_X, EXT_MIN_Y, EXT_MAX_X, and EXT_MAX_Y.
- Project the point features on the map view by creating a point layer based on the output in Step 1 using the Make XY Event Layer tool.
- Navigate to View > Geoprocessing.
- In the Geoprocessing pane, search for the Make XY Event Layer tool in the search box.
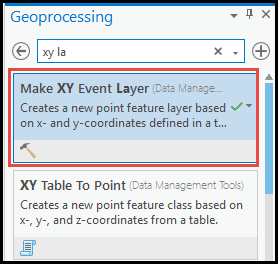
- For XY Table, select the polygon layer.
- Select the X and Y fields of the Geometry Properties output in Step 1 for X Field and Y Field. Only one geometry property is projected at a time.
- Specify a name for Layer Name.
- Specify the appropriate Spatial Reference. Ensure the default coordinate system matches the coordinate system of the input feature. The sample image below shows a layer created for the minimum extent field.
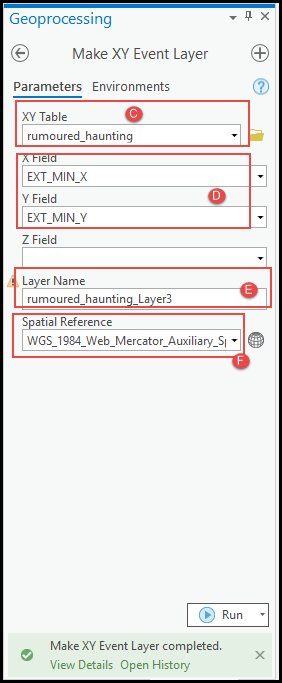
- Click Run.
- Repeat Steps 2a through 2f to project the other geometry properties on the map.
The following image shows the centroid and the minimum and maximum extent of each polygon. The Make XY Event Layer tool is run three times to project the three geometry properties.
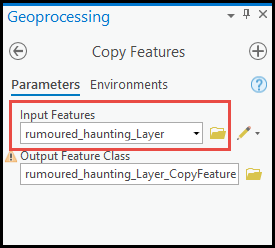
- Create a feature class containing the point features output from Step 2.
Note:
The layer created by the Make XY Event Layer tool is temporary and limited to the current ArcGIS Pro session. The data must be exported to create a permanent layer.
- Navigate to View > Geoprocessing.
- In the Geoprocessing pane, search for the Copy Features tool in the search box.
- In the Copy Features tool, under Parameters, select the point feature layer for Input Features. Click Run.
Artikel-ID: 000026726
Holen Sie sich Unterstützung mit KI
Lösen Sie Ihr Problem schnell mit dem Esri Support AI Chatbot.


Zugehörige Informationen
Weitere Informationen zu diesem Thema erkunden
Search for related information
Find training related to this topic
Explore ideas and give feedback
Unterstützung durch ArcGIS-Experten anfordern
Beginnen Sie jetzt mit dem Chatten