HOW TO
Create a SQL Server Authenticated user in Microsoft SQL Server Management Studio
Summary
Instructions provided describe how to create a new SQL Server Authenticated user within Microsoft SQL Server Management Studio to be used with an Enterprise Geodatabase.
The instructions below are specific for creating users for use in conjunction with an Enterprise Geodatabase. Please consult the database administrator to perform such operations.
Further information can be found in the ArcGIS Desktop Help. Please refer to the Related Information section below.
Note:
If it is necessary to create users manually instead of using the Create Database User tool, please see Create Database User (Data Management).
Procedure
Note:
To use SQL Server Authentication, the SQL Server Database Engine must use mixed mode authentication. For more information see the Microsoft SQL Server Choose an Authentication Mode documentation.
- Open Microsoft SQL Server Management Studio.
- Connect to SQL Server as a user who is a member of the sysadmin fixed server role.
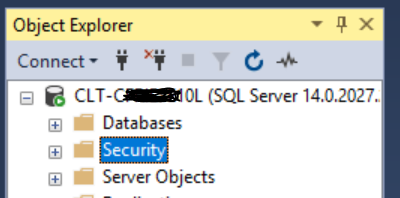
- Right-click on the Security folder > New > Login.
Note:
This folder is found after expanding the SQL Server instance in the Object Explorer.
- Type in a Login name.
- Check the option for SQL Server Authentication and type in a password.
![[O-Image] password](https://webapps-cdn.esri.com/CDN/support-site/technical-articles-images/000009958/00N39000003LL2C-0EM39000000wd6V.png)
Note:
If 'Enforce password policy' is checked, the password must conform to your organization's password policy. See the Microsoft SQL Server Password Policy documentation for more information.
- Click User Mapping at the top left under Select a Page.
- Check the database(s) to apply the user to, and type in the username for Default Schema.
![[O-Image] user_mapping](https://webapps-cdn.esri.com/CDN/support-site/technical-articles-images/000009958/00N39000003LL2C-0EM39000000wd6Q.png)
Note:
For users that create tables, feature classes or views, the User and Default Schema must be the same.
- Click OK. The user and schema are automatically added to the database(s). This user is now able to connect to the database.
If this user is intended to create views, feature classes or tables and import data, additional permissions need to be assigned to the user.The following steps describe the procedure to assign the additional permissions. - Right-click the database in which the user was applied > Properties.
- Select Permissions from the top left corner of the Database Properties dialog box under the Select a Page heading.
- Select the newly added user on the right.
- Below the user is a list of permissions. All users will have CONNECT by default. Apply additional permissions to the user by checking the box under Grant:
- Users who create tables, feature classes, and views require
- CREATE PROCEDURE
- CREATE TABLE
- CREATE VIEW
- Users who create tables, feature classes, and views require
![[O-Image] permissions](https://webapps-cdn.esri.com/CDN/support-site/technical-articles-images/000009958/00N39000003LL2C-0EM39000000wd6P.png)
- Click OK. This user is now able to create views, feature classes or tables and import data.
Article ID:000009958
- Legacy Products
Get help from ArcGIS experts
Download the Esri Support App
Related Information
Discover more on this topic
Search for related information
Find training related to this topic
Explore ideas and give feedback