HOW TO
Hide features in Data Driven Pages so only the feature of interest is visible
Summary
Instructions provided describe the steps to hide or mask all other features outside the extent of the feature of interest designated by the Data Driven Pages indexing layer.
Procedure
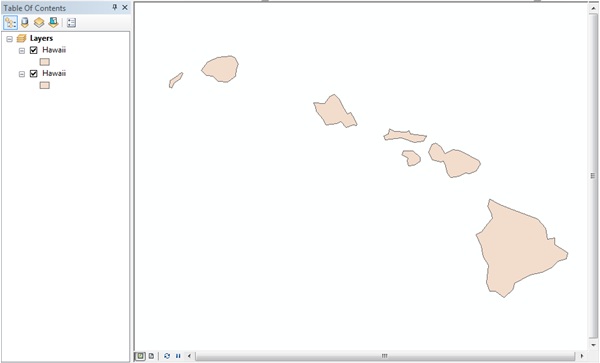
The following workflow is most useful when working with polygon features as the Data Driven Pages indexing layer. For example, when each of the Hawaiian islands must be displayed on their own data driven page without parts of the nearby islands showing.
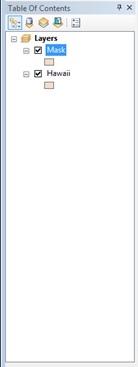
- Add the Data Driven Pages indexing layer to the Table Of Contents twice.
- Of the two identical layers, name the top-most layer Mask.
- On the View menu, select Layout View.
- Turn on the Data Driven Pages toolbar if needed. On the Customize menu, click Toolbars > Data Driven Pages, and click the Data Driven Page Setup button.
- Select the Enable Data Driven Pages option under the Definition tab.
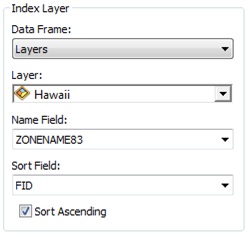
- From the Layer drop-down, select the layer with the original layer name from the list (not Mask).

- Select the desired Name Field, and note this for Step 9. Click OK.
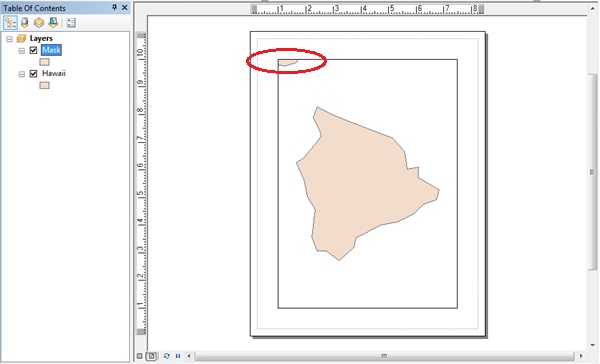
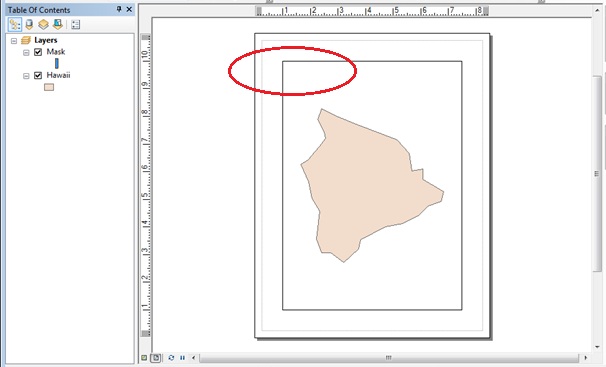
Note:
When browsing through the Hawaii map book, there are slivers of nearby islands displayed, which are not the feature of interest for each page. See the following screen capture, and note these slivers, circled in red.
- Open the Layer Properties for the Mask layer, and click the Definition Query tab, then click Page Definition.
Note:
Page Definition Queries are only available when Data Driven Pages are enabled. If Data Driven Pages are not enabled, the Page Definition button on the Definition Query tab of the Layer Properties dialog box cannot be seen.
- Click the Enable check box, and set the Page Name field to the same field used to enable Data Driven Pages in Step 7.
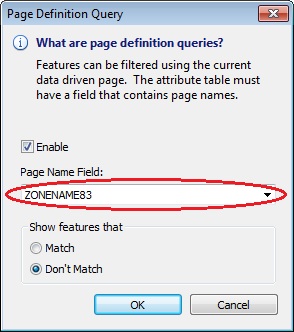
Note:
By choosing the same Page Name field as the Name Field specified in the Data Driven Page Setup dialog box, the Mask features are now filtered by name for the current page. While browsing through the pages, the query changes, and a new set of features is drawn appropriate to the new page. By choosing 'Not Match' in the next step, all features in the Mask layer that do not match the name for the current page are displayed.
- Select Don't Match, click OK and Apply, and click OK again.
Note:
Currently, the page definition does not appear to have changed anything in the map, but the Mask symbology must still be changed.
- Click the Mask symbol in the Table of Contents to open the Symbol Selector.
- Change the Fill Color and the Outline Color to the same color as the layout background color. In this example, the Fill Color and the Outline Color is set to White, and click OK.
- Browse through the Data Driven Pages. Only the feature of interest is visible and all other parts are not displayed.
Note:
If planning to use a background, basemap, or raster layer in the map, this workflow does not provide desired results.
Article ID:000011376
- ArcMap 10 x
Get help from ArcGIS experts
Download the Esri Support App
Related Information
Discover more on this topic
Search for related information
Find training related to this topic
Explore ideas and give feedback